
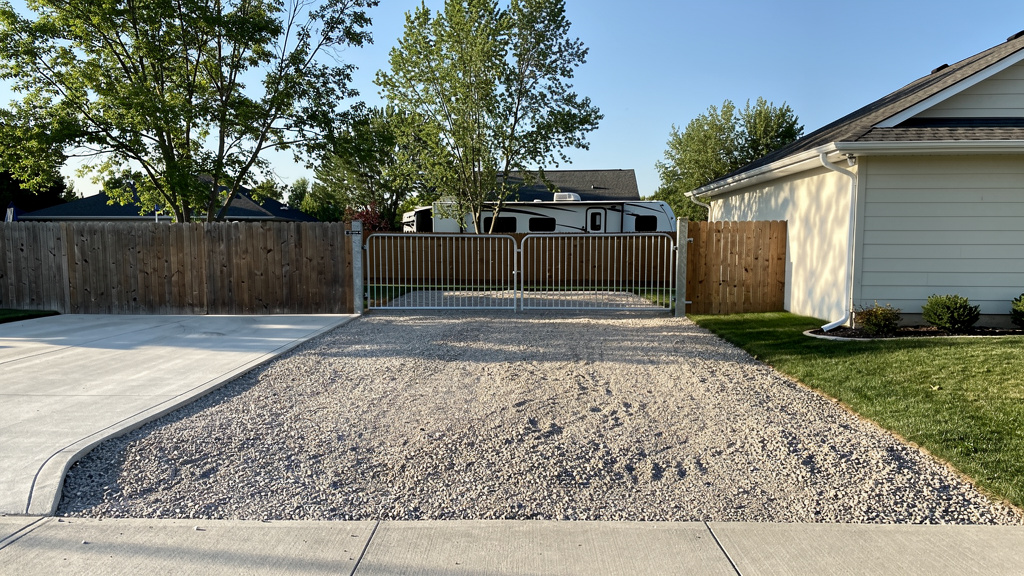
What should photos of an RV or boat storage space help renters understand?
Photos should document the usable storage area and the route needed to reach it, not just make the property look attractive. Renters need visual clues about length, width, turning room, overhead clearance, surface condition, slope, and nearby obstacles before they decide whether to ask questions or book.
A close-up of a clean gravel pad may look pleasant, but it doesn't answer the renter's main concern: can their RV, boat, or trailer reach and occupy that spot? The first image should establish the whole area, while additional images explain the parts that affect real-world use.
Think of the listing as answering a practical question about whether the space can be evaluated from the available information. A renter may need to compare your measurements with a motorhome, travel trailer, fifth wheel, boat trailer, tow vehicle, or equipment attached to the vehicle.
Show the space in its actual setting. If it sits behind a house, beside a fence, under a carport, or at the end of a narrow driveway, those details belong in the listing. An open lot, enclosed garage, side yard, covered pad, and gated driveway each create different access questions.
A clear photo does not guarantee that a vehicle will fit, and it does not replace measurements. It gives renters a better starting point and reduces the chance that an important limitation stays hidden until arrival. Hosts looking for examples of available storage arrangements can browse storage spaces to see how different types of areas may be presented.
Which views should you capture before publishing the listing?
A useful shot list covers the storage area, the route to it, and the conditions that may limit access. Capture the following six views as coverage priorities, not as a universal photo-count rule. The right number of images depends on the size, layout, and complexity of the property.
- The full storage area: Stand far enough back to show the complete usable footprint, including its boundaries. Include nearby buildings, fences, trees, and other features that help renters understand the scale.
- The approach from the street: Photograph the route a driver will take before reaching the property. Show the driveway entrance, curb, road position, and any narrow approach that may require a wide turn.
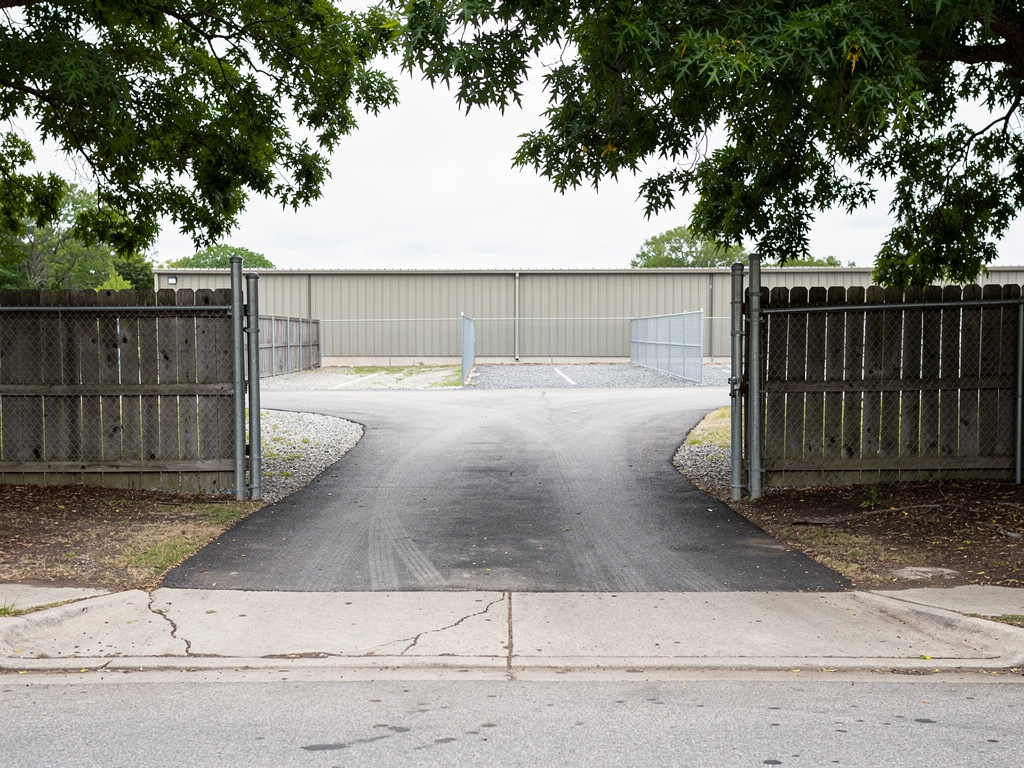
- The entrance or gate: Take a clear view of the gate, garage opening, carport entrance, or other access point. If there is a measurement for the opening, include it in the caption or listing details.
- The turning path: Show corners, backing areas, slopes, and the space available to align an RV or boat trailer with the storage pad. A final parking spot may be roomy while the turn leading to it is tight.
- The ground surface: Photograph pavement, gravel, grass, dirt, drainage areas, potholes, or uneven sections in ordinary light. Renters need to know what their tires and trailer may encounter.
- Overhead and side obstacles: Include branches, wires, roof edges, poles, retaining walls, fences, parked vehicles, and other objects near the route or storage area. Take separate detail photos when an obstacle is easy to miss in a wide shot.
A practical order is to photograph the approach first, then walk the route toward the final spot. That approach mirrors the renter's experience and makes it less likely that you will forget an entrance, turn, or low branch.
Captions add useful context. Phrases such as “view from the gate,” “gravel pad beside the garage,” or “low branch near the driveway turn” tell renters what they are seeing without promising that a particular vehicle will fit.
How do you photograph the entry route for an RV or boat trailer?
Photograph the complete route from the street or property entrance to the storage spot. Include the driveway width, gate, turns, slopes, overhead conditions, and maneuvering room because a boat trailer or long RV may need more space to reach the final parking area than the storage footprint itself suggests.
Start at the public approach and take a photo facing the entrance. Then stand at the gate or driveway and photograph the path inward. Continue from the turning point and take another view toward the storage area. This creates a visual sequence instead of leaving renters to guess how separate photos connect.
For a gated location, show the gate in both its closed and open positions when that adds useful information. If the gate must stay open during arrival, explain that in the listing rules. A narrow gate, angled entrance, sharp turn, or sloped drive should appear clearly rather than being hidden by a flattering camera position.
Boat trailers deserve special attention because the trailer, hitch, and tow vehicle all affect maneuvering. A renter may need room to swing the trailer into place, back up, or straighten the vehicle. Photograph any retaining wall, fence corner, utility pole, neighboring vehicle, or building edge close to the turning path.
Low branches and wires can be hard to see against a bright sky. Take one photo from the driver's approach and another looking upward from the route. If the overhead space changes between the entrance and the storage pad, show both areas and provide the host-measured clearance where possible.
A photo cannot establish a safe clearance for every vehicle. Mirrors, roof equipment, ladders, antennas, awnings, trailer hardware, and towing configurations vary. Treat the images as visual evidence that supports the written dimensions, not as a promise that every RV or boat will pass.
For a space located on a larger lot, browse lots for RVs, boats, and trailers to understand how lot-style storage differs from a driveway or enclosed area.
What details help renters judge whether their vehicle will fit?
Renters need more than a general impression of size. Pair photos with measurements and descriptions covering the five fit details below. RVs, boats, trailers, and tow vehicles differ widely, so the host's information should help each renter compare the space with their own complete setup.
- Usable length: Photograph the full length from one boundary to the other, then state the host-measured usable length. Account for walls, fences, posts, wheel stops, and room needed to enter or exit without contacting an object.
- Usable width: Show both side boundaries and identify anything that reduces the practical width. A space between two fences may measure wider at the back than at the entrance, so photograph the narrowest part of the route.
- Vertical clearance: Show garage doors, carport roofs, branches, wires, gates, and other overhead restrictions. Measure the lowest relevant point, not only the height above the center of the storage pad.
- Surface and slope: Photograph pavement, gravel, grass, dirt, mud, drainage channels, potholes, and uneven areas. Mention a noticeable slope or soft ground in the listing instead of relying on renters to spot it from a picture.
- Nearby obstacles: Include trees, poles, walls, fences, buildings, parked vehicles, and neighboring structures. Explain whether an object affects entry, turning, storage, or access to the vehicle after it is parked.
RV dimensions are not always described in exactly the same way. The RV Industry Association's guidance on vehicle length labels discusses different measurement approaches and exclusions for certain appurtenances. That general guidance does not determine whether a specific RV fits your space.
Ask renters to compare your stated dimensions with the complete dimensions of their vehicle and trailer. A “30-foot RV,” for example, may not tell the whole story if the renter also needs clearance for a hitch, equipment, mirrors, or a tow vehicle during arrival. Don't describe a space as suitable for any RV or any boat unless you have a specific, supportable reason to do so.
How can you use wide shots without making the space look larger?
Wide views are useful for showing a large storage area, a confined driveway, or an indoor space where a normal view leaves out important boundaries. However, an extreme wide-angle setting or camera position close to a corner can make the foreground look unusually broad and bend fences or walls.
Use the widest setting only when it adds necessary coverage. Hold the camera level, keep straight lines near the center of the frame when possible, and step back instead of moving extremely close to one boundary. Take a second view from another position so renters don't have to rely on one exaggerated perspective.
The Nikon guide to focal length explains why wider lenses are useful in confined spaces while also showing how lens choice and camera position affect perspective. You don't need specialized equipment to apply the basic lesson. A phone camera can work when the image remains level, sharp, and representative.
Avoid pointing the camera sharply upward or downward when trying to show dimensions. That angle can make walls, posts, and fences appear to lean. A level, straight-on photo usually gives a more dependable impression of the route and its boundaries.
Wide shots should be paired with close detail views. Photograph the gate, surface, lowest branch, narrowest point, and tightest turn separately. Those images give renters reference points that a broad scene may hide.
Don't digitally stretch the image, remove an obstacle, or crop away the edges that define the space. Ordinary brightness and color corrections are reasonable, but editing should not change the apparent size or condition of the property. Accurate representation matters more than making a small area look expansive.
What should you do when lighting, surfaces, or obstacles make photos unclear?
Common problems include shadows hiding uneven ground, bright skies washing out branches, angles concealing the entrance, and editing that minimizes obstacles. Reshoot from a clearer position and correct only ordinary brightness or color issues so the final images remain faithful to the space.
- Shadows hide the ground: Take another photo when the storage pad is evenly lit, or use a viewpoint that shows potholes, ruts, drainage, and surface changes. Avoid photographing a dark driveway where renters cannot tell whether it is level.
- The sky hides branches and wires: Change your angle so the obstacle contrasts with the background. A closer detail image can show a low branch or wire that disappears in a bright, backlit scene.
- The entrance disappears from the angle: Photograph the route from the street, then from inside the entrance looking outward. If a gate opens inward or a turn is restricted, explain that in the caption or access instructions.
- Editing makes the property misleading: Adjust exposure or color modestly, but don't remove vehicles, poles, branches, puddles, fences, or other features that affect use. An inconvenient fact is still useful information for a renter.
Weather and time of day can change how a space looks. Wet grass may conceal soft ground, while harsh midday light can create deep shadows beside a building. You don't need perfect professional conditions, but you do need enough visibility for a renter to understand what they are seeing.
Check every image at full size before uploading it. Blurry corners, glare, dirty lenses, and accidental reflections can hide details that matter. If a photo doesn't clearly show the feature it is supposed to explain, replace it rather than relying on a vague caption.
The Realtor.com photography guidance recommends planning a shot list and considering height, perspective, and multiple viewpoints. Those ideas transfer well to storage listings, where missing one gate, turn, or obstacle can create confusion.
How should accurate photos support a Parking Mate storage listing?
Parking Mate hosts can create listings with space details and photos, set their own availability, and describe access rules. Use images to support measured information, explain limitations clearly, and invite renters to compare the listing with their vehicle's full dimensions rather than treating photos as a fit guarantee.
A strong listing usually combines three kinds of information:
- Visual evidence: Show the overall space, entry route, gate, surface, clearance, and obstacles.
- Measured details: State the usable length, width, opening size, and lowest clearance as accurately as you can.
- Access instructions: Explain arrival rules, gate operation, turning limitations, surface conditions, and any restrictions on when or how the renter may enter.
Captions should identify the purpose of each image. “View from the street toward the gate” is more useful than “front view.” “Lowest branch is near the entrance” gives a renter a reason to inspect that part of the image. Keep the wording factual and avoid phrases such as “fits anything” or “plenty of room.”
Parking Mate does not measure, inspect, certify, or guarantee that a vehicle will fit. The host remains responsible for the listing's photos, measurements, availability, and access information. Renters should also ask questions when their setup is unusual or close to the stated limits.
Property permissions deserve a separate check. HOA rules, leases, zoning, condominium documents, insurance questions, and tax treatment may vary by location and property type. Photographing or listing a space does not make RV, boat, or trailer storage legally approved. Contact the relevant local authority or a qualified professional when those issues are unclear.
If the space is ready to describe accurately, you can list your storage space on Parking Mate. Hosts can also review how Parking Mate works for hosts before preparing the listing. Clear photos won't promise a booking, but they give renters the information they need to judge the space more responsibly.
Related reading
Frequently asked questions
What should the first photo of an RV or boat storage space show?
The first photo should show the overall storage area and enough of its surroundings to establish the available space. Add separate photos of the approach, entrance, turning area, surface, and overhead or side obstacles.
Should I photograph the route to the storage space?
Yes. Photograph the route from the street or property entrance to the storage spot, including gates, turns, slopes, narrow sections, and any overhead obstructions that could affect an RV or boat trailer.
Can a wide-angle photo prove that an RV will fit?
No. A wide-angle photo can show more of a confined area, but it may exaggerate width or distort straight lines. Pair wide views with level, straight-on photos, detail shots, and host-measured dimensions.
What should I disclose about obstacles and surface conditions?
Show and describe trees, low branches, wires, fences, poles, retaining walls, parked vehicles, slopes, potholes, gravel, grass, mud, and drainage concerns. Clear captions help renters understand what appears in each image.
Does Parking Mate measure or certify whether a vehicle will fit?
No. Parking Mate lets hosts provide listing details and photos, but hosts are responsible for their own measurements and descriptions. Renters should compare those details with the full dimensions and towing setup of their vehicle.